Main Screen

To access the UTComp menu, press F5 on your keyboard. If for some reason you have F5 remapped to another keybind, or it doesn’t work for some reason, go to your command console (press the `/~ (grave/tilde) key) and type ‘mymenu’. This will open the main UTComp menu.
This screen tells you a few things:
- What version of UTComp is running on this server. 1.7a is the most recent version.
- What brightskins mode is set on the server.
- How the hitsounds work on the server.
- Whether double damage pickup is enabled on the server.
- Whether Netcode is enabled on the server.
Also on this main menu there are two large buttons, Ready and Not Ready. These are only important if the server is configured with a pre-round warmup time. The private CTC server usually has a warmup time of 2 to 5 minutes. To signal to the server and other players that you’re ready to play, click ‘Ready’ on this screen. You can also type ‘ready’ or ‘notready’ at the command console.
Skins/Models screen
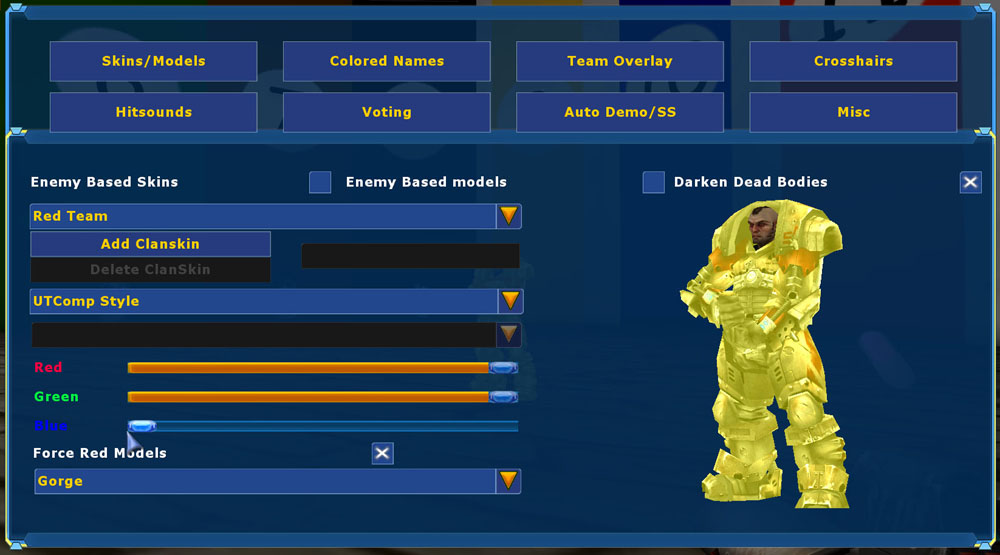
This screen allows you to set all aspects of the bright skins feature. I have my settings as shown. If you check Enemy based skins or enemy based models, the pulldown changes a bit, and I’m currently a little confused as to how this works, so I don’t use them. The first pulldown allows you to select the team you’re making skin changes to. Select a team (Red shown here). The next pulldown allows you to select the bright skins type that you’d like to use. UTComp style is the brightest, Regular means no bright skins enabled. Epic bright skins uses the built in bright skins in the game, as well as the player glow. I personally don’t think the Epic bright skins are much brighter, so I keep mine at UTComp style.
The RGB sliders allow you to change the actual color for the selected team. In this case, I’ve made the Red team actually look yellow. This is a choice, and you can mess with the sliders all you want to adjust the colors. Certain colors make it easier to see. Yellow is pretty bright!
There is a check box that says ‘force red (or blue) models’. Check this and select the model in the pulldown below it. I like to use the GORGE model (shown) for everybody, both red and blue. He’s big and bulky so players are nice fat targets.
Do the same things with the Blue team as well. A nice color option for blue is to set the blue and green sliders to 100%, resulting in an aqua color. Again, it’s pretty bright so it helps out.
Finally, I like to check ‘darken dead bodies’. That way, the moment a player dies, the bright skin is removed.
Colored names screen
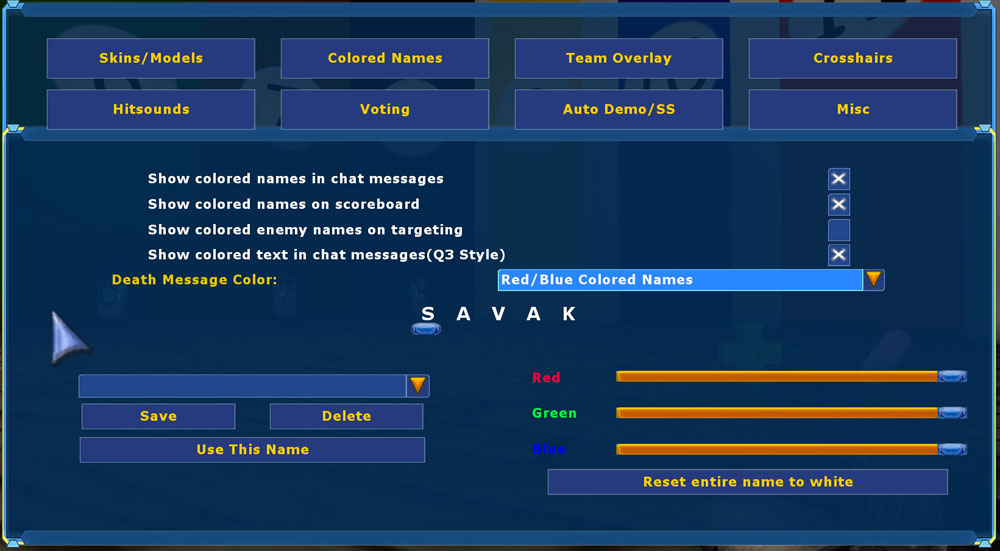
On this screen you can change the way your name shows up on the menu and other places. The first four check boxes are pretty self-explanatory. After playing the last couple nights, I think I’m going to turn off all colored names by unchecking all boxes. It actually makes them hard to see in the scoreboard, which I check often to see who’s carrying the flag. Use the pull down to select the way death messages are displayed. Again, self-explanatory.
In the center of this screen, your current name is shown. Move the indicator under each character of your name, and then adjust the RGB sliders below. White is 100% on all three colors, black is 0% on all three. Once you’re set with the colors, click Save. The saved names will appear in the pulldown to the left. You can create multiple names and select them here. To use the selected name, click ‘Use this name’. Easy?
Team Overlay screen
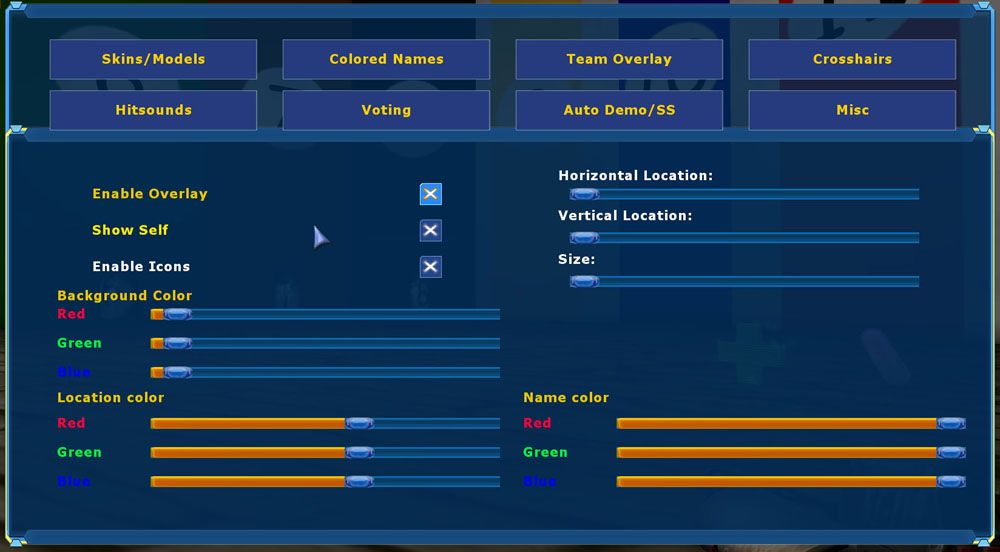
UTComp's Team Overlay allows players to get detailed info on what other players are doing in the game, by displaying their current location, health, armor, powerups and weapon used. The setting on this screen are simple and outlined below. I personally don’t like the overlay, but it is on by default on our server so you can use it or not.
- Enable Team Overlay
Allows the player to enable or disable his own team overlay. - Show Self
If enabled, you will show up on your own screen on the team overlay. If disabled, only your teammates will be shown. - Enable Icons
If enabled, armors and health icons will be shown in the first row. This can be disabled to make the overlay slightly smaller. - Horizontal Location
Allows modification of the overlay window's location on screen, on the X axis. The higher the slider, the more the overlay will show on the right side of the screen. Note that if you set this too high, it might not fit in entirely in the screen at certain resolutions. - Vertical Location
Allows modification of the overlay window's location on screen, on the Y axis. The higher the slider, the lower the overlay will show on the screen. Note that if you set this too high, it might not fit in entirely in the screen at certain resolutions. - Size
Allows modification of the size of the overlay window. Increasing this will scale everything up (text and icons), making things slightly easier to read, but obviously taking more screen space. Decreasing this has the opposite effect. - Background Color
Changes the Team Overlay window's Background Color, using red/green/blue sliders. - Location Color
Changes the color that player locations are displayed in the Team Overlay, using red/green/blue sliders. - Name Color
Changes the color that player names are displayed in the Team Overlay, using red/green/blue sliders.
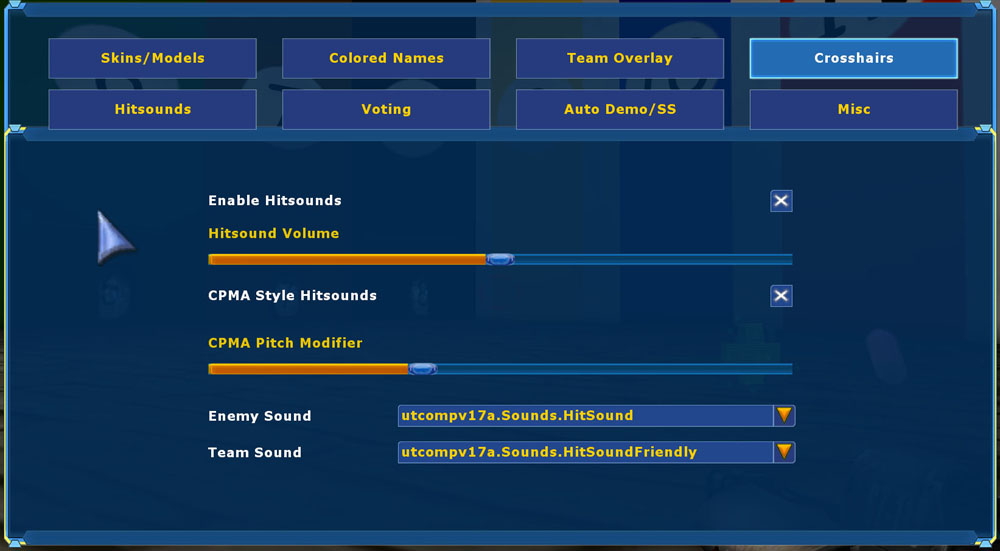
One of the major benefits of UTcomp is the hitsounds. I can’t play on a server without them anymore. It give you instant feedback, especially with hitscan weapons. This screen is fairly simple. Check enable hitsounds to turn hitsounds on or off. Adjust the volume with the slider. I find the default settings pretty good. The CPMS style hitsounds allow for the variable pitch hitsound. A higher pitch means less damage, a lower pitch means more damage. I like the pitch adjustment feature, and the pitch range can be modified with the slider. Again, the default settings work well for me. Finally, you can select the sound used with the pulldowns. Since friendly fire is not turned on for either of our servers, the ‘team sound’ doesn’t matter.
Auto Demo/SS Screen
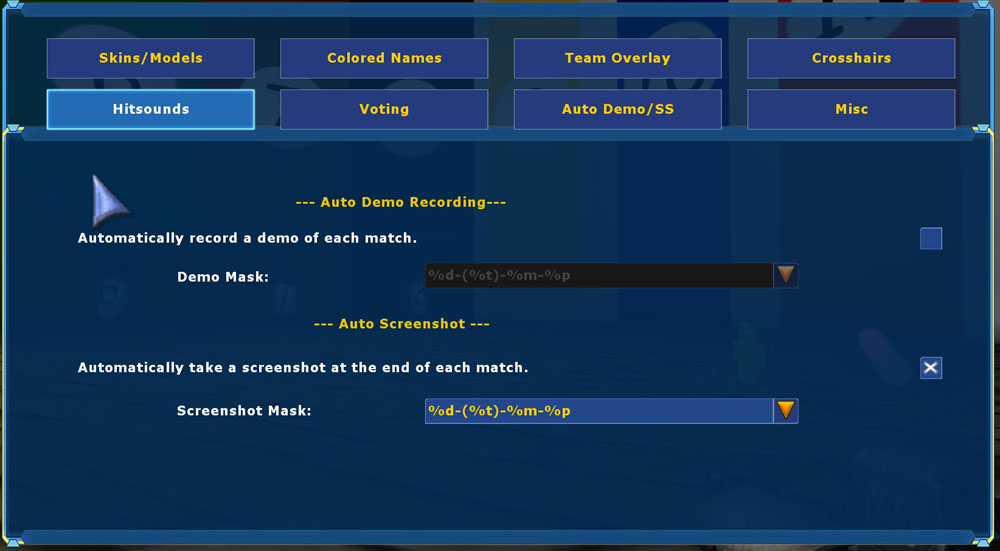
This screen allows you to automatically record client-side demos of the match, as well as take a screenshot at the end of the match. I don’t use the demo feature, but the screen shot feature is cool. Especially if you’re playing a scrim or match and you’d like to post the screen on the forums. The demo or screen shot mask defines how UTComp will name the resulting file. Here is a brief explanation of the mask codes: %d will add the current date, %t will add the current time in a 24 hour HH:MM format, %p will add your player name and %m will add the current map's name.
MISC Screen
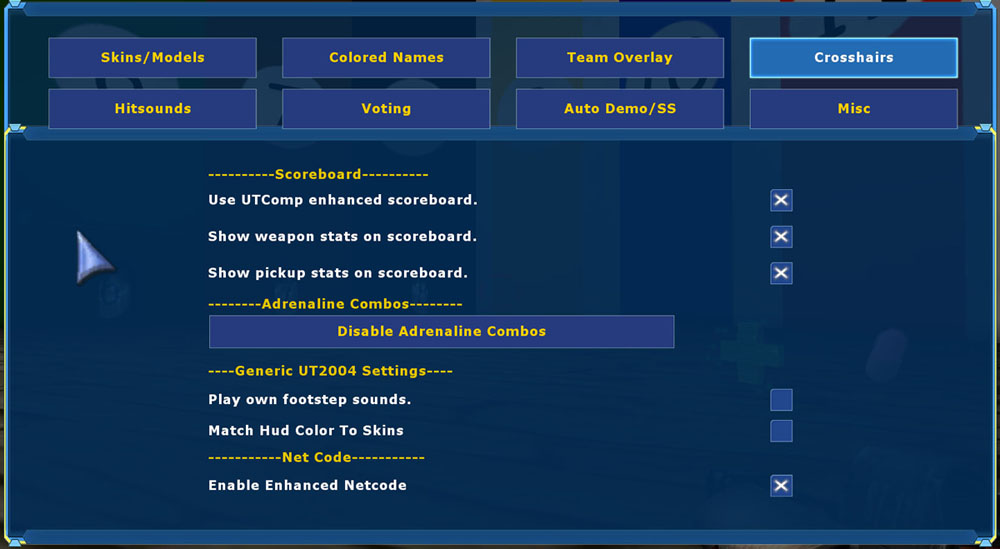
This screen holds stuff that doesn’t fit anywhere else, but it has some important settings. The Scoreboard settings define how the scoreboard works. You can choose to use the UTComp style scoreboard, and whether or not to show weapon and pickup stats on the scoreboard. For most public games, the stats don’t matter much unless you’re really interested. NOTE: If you use the UTComp scoreboard, only the top 8 players on each team will be displayed. This is a known limitation of UTComp. Since we have 18 slots and sometimes more than that on, I plan to turn off the UTComp scoreboard in the future.
I like the idea of turning off my footsteps sounds. Please note that they are still audible to other players, you just won’t hear your own. This allows you to focus on the footsteps of other players. The ‘match hud color to skins’ will do just that: If you’ve set your team skin color to be green or aqua or something other than red and blue, check this box to adjust your hud color to match that custom skin color. I like to keep my HUD the same old RED/BLUE as I sometimes get confused of what team I’m on if I’ve changed the skin colors dramatically.
And finally, but not at all in the least, the ‘Enable Enhanced Netcode’ check box is at the bottom of this screen. For the most part, you want to keep this on. But, with it on, you will have a hard time linking the manta if you’re riding on its wing. Turn netcode off and this problem goes away. This is a pain in the butt, and I’m working on finding a keybind to change it (instead of going into the menu to do it), but I don’t know if a keybind is available. So note that if you’re going to be riding a manta wing a lot, turn netcode off.
As I said at the top of this post, please reply with your thought or ideas or corrections. Thanks for reading and have fun!